The Denim Rag Pattern marches on!

The continuing saga of the Recycled Jeans/Denim Rag Quilt Pattern!

My pattern continues to develop. I’m almost done with the rough draft. I’ve been making corrections as I go so I think it’s a bit better than a true rough draft.

As I think I’ve mentioned before, it’s definitely a challenge to put actions into words. I know what I mean but am I getting that across?

Here’s a sample of something I’ve written. What do you think? Is it clear? Too wordy?

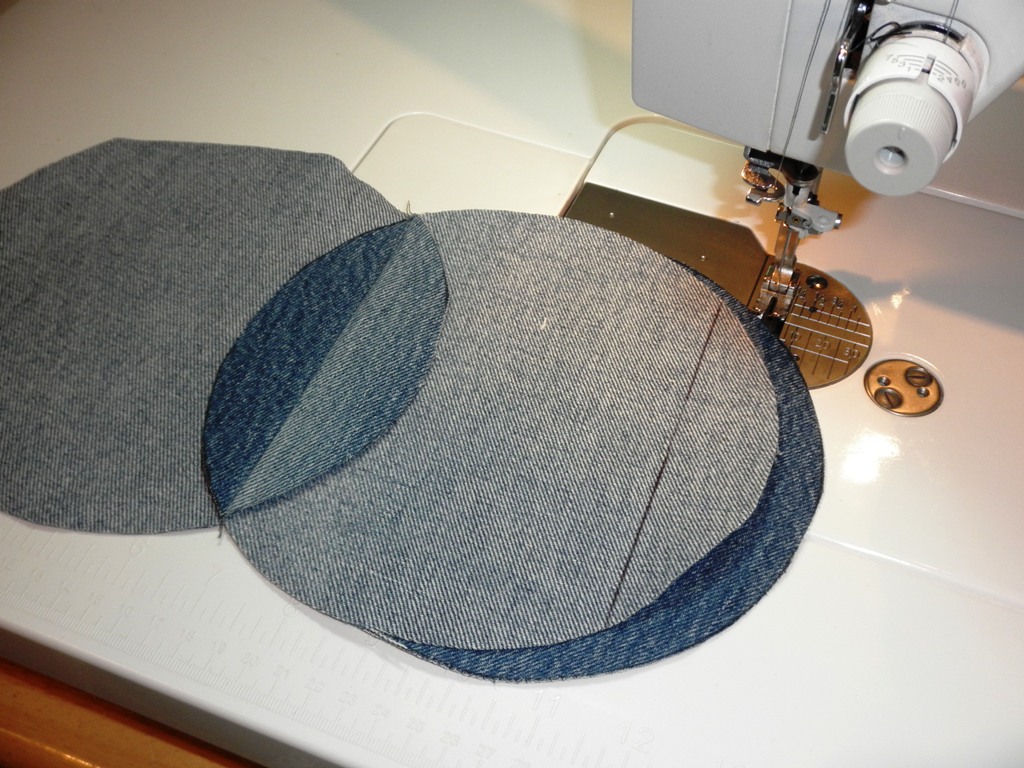
“Place the first denim circle WRONG side up on your work surface. Using a ruler, measure 1 ¼” from the outer most edge of the circle and mark this line along the edge of the ruler. Any pen will work; you will never see the line.

Place the marked circle and a second, unmarked circle from your row, RIGHT SIDES TOGETHER. Pin and sew along this line.”


Here’s where we left off last time. The table runner was completely assembled but not yet “raggy”. At this point, I got out the spring loaded scissors.
OLYMPUS DIGITAL CAMERA
Okay, there’s a separate blog post coming about spring loaded scissors.
I’ve learned a lot about them and which ones are more reliable.

Here’s what the runner looked like after clipping the edges with the rag scissors.

PC180016PC180017
I trimmed every edge except the outer edges. There’s no point in trimming them because they will be cut away prior to binding.

After trimming, I went to work on the clipped edges with a stiff brush. Similar in feel to a toilet brush, I always go over my trimmed edges with this brush. I find that it really speeds up the fraying process.
PC180031

As you know, a rag quilt gains it’s frayed, ragged edges after multiple washings and dryings. This is, of course, an important part of the process.
However, I give my quilts a good “once-over” with the brush before the first washing to speed the process of fraying.

PC180029

It can make a bit of a mess on your work surface but think about what you’re getting out ahead of time that won’t get stuck in your dryer’s lint trap!


PC180037

You can see how the brush lifts up the edges and begins to create that frayed look we are going for.
PC180040

And, here’s what it looks like after washing and drying.

PC180041

All that’s left is to cut away the edges and add the binding.

Heather

Finishing Up the T-Shirt Quilt!


So, I’ve been gone from Blogdom for a while. The holidays just took over and that was my only focus for a while!

But…I’m back!

I did get the t-shirt quilt finished in time for Christmas. I finished sewing on the label at 8:30pm Christmas Eve!! Oh well, it was fun and he REALLY liked it! That was the point!

Here’s where I left off with my last blog post.  The top was completed and ready to go to the quilters (AKA “Mom”).
OLYMPUS DIGITAL CAMERA         OLYMPUS DIGITAL CAMERA

Got it back from my Mom a few days later and got busy on the binding.


OLYMPUS DIGITAL CAMERA         OLYMPUS DIGITAL CAMERA


I knew in the back of my head that I was not going to let this quilt get out the door without a label!! It’s happened too many times where I took until the last minute to finish the quilt and never got the chance to add one.
So…I made sure I built enough time into the finishing and I was happy with the finished result. Normally, I print the label on prepackaged paper backed fabric. However, I just read an article about a woman who prints her message on the computer (in whatever font she likes), puts a piece of fabric over the paper and traces the message in her own hand.
What a great idea!!
I decided to give it a try and I was really happy with the results. Here’s what it looked like!

OLYMPUS DIGITAL CAMERA
It’s personalized but neat.
In my next post I’ll talk about putting the finishing touches on the rag  quilt/table runner. The fun continues!

Take Care!
Heather

I know I've been absent...

No...we didn't have a white Christmas.  This picture was actually taken on my street at Thanksgiving!!


I know I've been away from my blog for about a week now.  Christmas just really took over and although there's been plenty of sewing going on....none of it has made it to my blog.

So...I'm back in gear and will start posting right away.

I need to fill you in on the t-shirt quilt (it was finished in time!), the rest of the denim jean rag pattern and it's progress and so much more!

I hope you all had a nice holiday season and I can't wait to fill you in on what I've been doing!!

Heather

The T-Shirt Quilt Continues…


The “Christmas present” continues to develop.  Only nine more days until this quilt needs to be wrapped and under the tree.


It’s ready for the sashing strips.

The owner of Windy Moon Quilts here in Reno taught me how to fold a fabric square (see below) to make cutting strips easy and on the bias at the same time!

I don’t know about you but I find cutting bias strips a pain.  This is a great and fast method.

OLYMPUS DIGITAL CAMERA
Windy Moon also carries a really nice line of flannel.  It’s super soft and comes in a great variety of plaids.

OLYMPUS DIGITAL CAMERA
 
As far as the colors of the sashing strips go, there were so many different colors of t-shirts in this quilt that there really wasn’t any way to choose  one color for a perfect match.

OLYMPUS DIGITAL CAMERA

I’ve used a similar plaid flannel before and I think it harmonized nicely with the variety of colors.  It’s not “matchy-matchy” but I think in this case it works just fine!

OLYMPUS DIGITAL CAMERA

I was happy with the first row.  Looking good…
OLYMPUS DIGITAL CAMERA

Finally, all four rows done. 

OLYMPUS DIGITAL CAMERA

I think he’s REALLY gonna like this quilt!
On to the corner stones and getting these rows put together.
Almost there!
P9180071

Smile Heather

The T-Shirt Quilt for Christmas


Another project that is due very soon is a Christmas present for a family member. I’m making him a t-shirt quilt out of his old shirts.

My mom pointed out to me that he had a clothes drawer that would barely shut. It was overflowing with old, holey, worn-out shirts.
A t-shirt quilt was obviously the PERFECT Christmas gift for him. And men are so hard to shop for so, yeah! 
Now, I just have to get it done in the next week and then get it to my Mom so she can quilt it, so she can get it back to me, so I can bind it-before Christmas.
No problem, right??  Winking smile

I’ve cut out the shirts..
OLYMPUS DIGITAL CAMERA

I’ve stabilized them all with French Fuse and made them into 15” squares.

OLYMPUS DIGITAL CAMERA

I’m happy with the squares, now I need to go to the LQS and find some coordinating fabric. I’m thinking flannel, plaid, colors?? Not sure…

It won’t be hard, I just need to carve out the time.

I can’t wait to see the look on his face when it’s done. I know it’s going to be great!!

OLYMPUS DIGITAL CAMERA         OLYMPUS DIGITAL CAMERA

Part II is on the way…


Good Night…
P8230007

Heather

The Pattern continues…Denim Rag Quilt

Update:  The pattern is complete!
You can purchase a copy at my Etsy Shop:


This is my continuing journey into creating a quilt pattern.  I am working through the instructions a little at a time.  With each new version I continue to revise the pattern.

Friday morning I was up bright and early and I finished sewing the flaps down on all three rows.

OLYMPUS DIGITAL CAMERA


Next, I did some measuring, making sure I was able to get the correct distance from the edge of the circles to the inside of the charm squares. This is the tricky part. It’s not easy to measure to the edge of a circle!!
The other option, measuring from the edge of charm square is really not viable because the squares aren’t perfectly aligned.

OLYMPUS DIGITAL CAMERA
I do have it figured out now. It’s taken a while but I’ve got this down!
Once the seams are marked, I line up the seams and sew. I always baste the seam first (by machine), that way if my seams are off it’s a lot easier to deal with it at the time.
When I’m sewing the “real” seam, I do a lot of reinforcing and I have found that it is SO much nicer to rip out a mismatched basting stitch then a double reinforced seam!!

OLYMPUS DIGITAL CAMERA

I have designed this pattern to have nice thick denim seams. Why?
A.) it helps to keep the denim from fraying and coming apart with multiple washings. When that happens you start to get little holes popping up throughout the quilt (been there-done that!)
B.) It provides more denim for clipping around the circles 
C.) The extra thickness looks really Great!

OLYMPUS DIGITAL CAMERA

After I’ve pressed down the new flaps I’m ready to sew. I like to go through the entire quilt and sew two rows together at a time. Then I match a set of two with another and end up with four rows.
I then match a set of four rows with another set of four rows and end up with a set of eight rows…etc, until I’m done and all the rows have been added to the quilt.
This makes it a LOT easier to manipulate this thing under the sewing machine. If you waited until all of the circles were sewn together to sew down the flaps, this thing would be a bear to move around under the machine!!

OLYMPUS DIGITAL CAMERA
In the next step, you sew the flaps down moving from one end of a row to the other. I have found a REALLY great, easy and fast way to do this. The problem is, I haven’t exactly figured out how to describe this method in words!

It also makes an awesome pattern on the back of the quilt. It’s hard to see in my pictures because the thread color matches the denim almost exactly. Next time I’ll do this with a different colored bobbin thread.

OLYMPUS DIGITAL CAMERA

So, what’s this easy-as-pie procedure for sewing down the flaps on the long part of the rows?
You start at one end with the newly folded flaps pressed down. You sew around the first flap just like you did in the prior step. However, you AIM for the center of the next block and then veer off around the opposite flap. You make a figure eight pattern down the whole row.
When you’re done, you flip this row around and go down the other way. When you’ve done it a second time, both sides of the flaps are sewn in place.
Confusing??? It’s really SO easy, it’s just something I’ve got to find a way to describe better!
OLYMPUS DIGITAL CAMERA
This is close to being down now. Like I said, it will just be a table runner this time so I can get these instructions done.

Now we’re ready for the clipping.  I’ll share with you what I’ve learned about the variety of rag quilting scissors out there.

See ya!
Heather

1970's Pattern Makeover

So, I was going through my quilting books, deciding if there were any that I just didn’t need anymore. (I know some people can’t bare to part with their books but I like to purge them every so often.)

My tastes change and why keep something that I’ll never use when someone else could be enjoying it? Besides, I’m trying to Simplify….ohmmmmmmmm.


During this process, I found an old quilting book that I got from my mother in law about 20 years ago. In reality, she didn’t GIVE it to me. She leant it to me but... if she hasn’t wanted it in 20 years, I figure I’m probably okay.


It is from 1979. I must admit, that I'm really not a fan of the old multi colored 70’s fabrics. They remind me of advocado colored appliances and plaid, polyester pants.


However, it got me thinking about something fun for my blog. What if I picked some projects that are old and outdated and “Made them Over” with current techniques and fabrics?


A Pattern Make-Over! OMG!


The egg bib cracks me up!!


Of course, I have NOTHING else going on in my life or quilting studio (ha-ha) but in reality I am completely unable to work on any one project from start to finish.

 
For me, going back and forth between projects is a MUST. Therefore, this could "easily" (did I say that?  I mean did I really say that??) be fit in between all of my other “goings-on”. :)


I just thought it was really a cool idea- making over an old, outdated project and showing the Before and After pictures. Coooooooollllllll…


I’m going to start with this.


Or this


I’d like to make the quilt and hang it over my couch for X-mas time. That would mean it would need to get done ASAP. However, I know (because I made it about 15 years ago) that it really goes together quick.


On the other hand, maybe I’ll just make the X-mas pillow. That would definitely be Do-Able BEFORE Christmas.


More coming on my denim jean quilt pattern in progress!  The charm squares are on and it's going together....


Heather


Denim Jean Pattern...(cont)


Update:  The pattern is complete!
You can purchase a copy at my Etsy Shop:


So...in order to stay focused on getting this pattern done, I've been getting up early before work to practice. 


I'm trying to get this down to a science.  It's not easy to translate what I know how to do in my head into written, easy-to-understand directions!  :)


Continuing from the other day...I've figured out how to maximize the number of circles I can get from a pant leg.  In this case, I was able to get 16 circles from one pair of jeans- NOT BAD!


It's taken me a while (and a LOT of practice) to get my measurements down to a science.  Since I'm making this up as I go, I've had to play with the exact measurements for sewing between circles.  I needed a size that would fit a charm square and still show off the fabric in the middle. 

I've made and remade these circles SO many times in order to finally get all of the measurements just right!  I am very pleased with how it's worked out! 


Sewing the denim circles end to end is actually quite easy now that I have a method for measuring consistently.  I never thought about it before but it's not easy to know how to measure from the end of a rounded edge!! ;)


I was honestly able to whip these out pretty quick!  It was fun and when I was done I was able to better envision what it would look like when finished!!


Although the pattern is for a quilt, I am making a table runner right now in order to practice the steps more than once. 

More pics to come with the charm squares inside! 

See ya and thanks for sharing the process with me!!

Heather


Progress on my New Pattern

Update:  The pattern is complete!
You can purchase a copy at my Etsy Shop:
Recycled Denim Jeans- Rag Quilt Pattern


I have posted several times in the past about the progress of my recycled denim jeans quilt. As I progressed I got some great feedback and I decided to turn it into a pattern.

I'm about a third of the way through the pattern draft and have been taking pictures along the way which I'd like to show here.

I've been thinking about how to help people can get the most possible usable yardage from each pair of jeans. 
I've found that if you cut the legs off just under the pockets and then cut down the inside of each leg seam, you'll get the maximum amount of fabric.

One pant leg cut open looks like this...


AND interestingly enough, I've found that if you start tracing circles at the Bottom of the pant leg you will get MORE circles then if you start tracing at the top.  I don't know why but somehow I'm maximizing the length better by starting at the bottom!  

As far as cutting out the circles, I've been going back and forth between using use a cardboard template for tracing the circles or using the Olfa circle cutter.


 OR


There are advantages to both and I'm trying to decide which one to recommend or to just talk about both.  I don't want to make things too complicated though...

I think the biggest challenge about this quilt is actually making the circles.  I've been doing a LOT of research and it's surprising but there are no really good ways to cut accurate circles.

Anyway, back to the drawing board (literally)!  
Heather

Material Girls Quilters

I belong to a great quilting group called “The Material Girls”. We get together twice a month.

AWESOME quilt Char!  Your hard work paid off!


The first meeting takes place at a member’s house where the host creates terrific food and we share our latest projects and ideas. There is a LOT of laughing and it’s always a great time!

 The other meeting takes place at a local quilt shop (thank you Sierra Sewing Center and Michelle) where we bring down our sewing machines and spend the evening sewing!


Of course, since it takes places in a quilt shop there MAY be a little shopping that goes on as well.

Excellent quilting job- Mom!


At every meeting we have food and we share our most recent projects. It’s a terrific group of ladies. Everyone is so supportive and it’s really fun to get together and share our favorite past time with other people who appreciate it!
 

Thanks guys!  :)


Total Pageviews

Related Posts Plugin for WordPress, Blogger...